Introduction
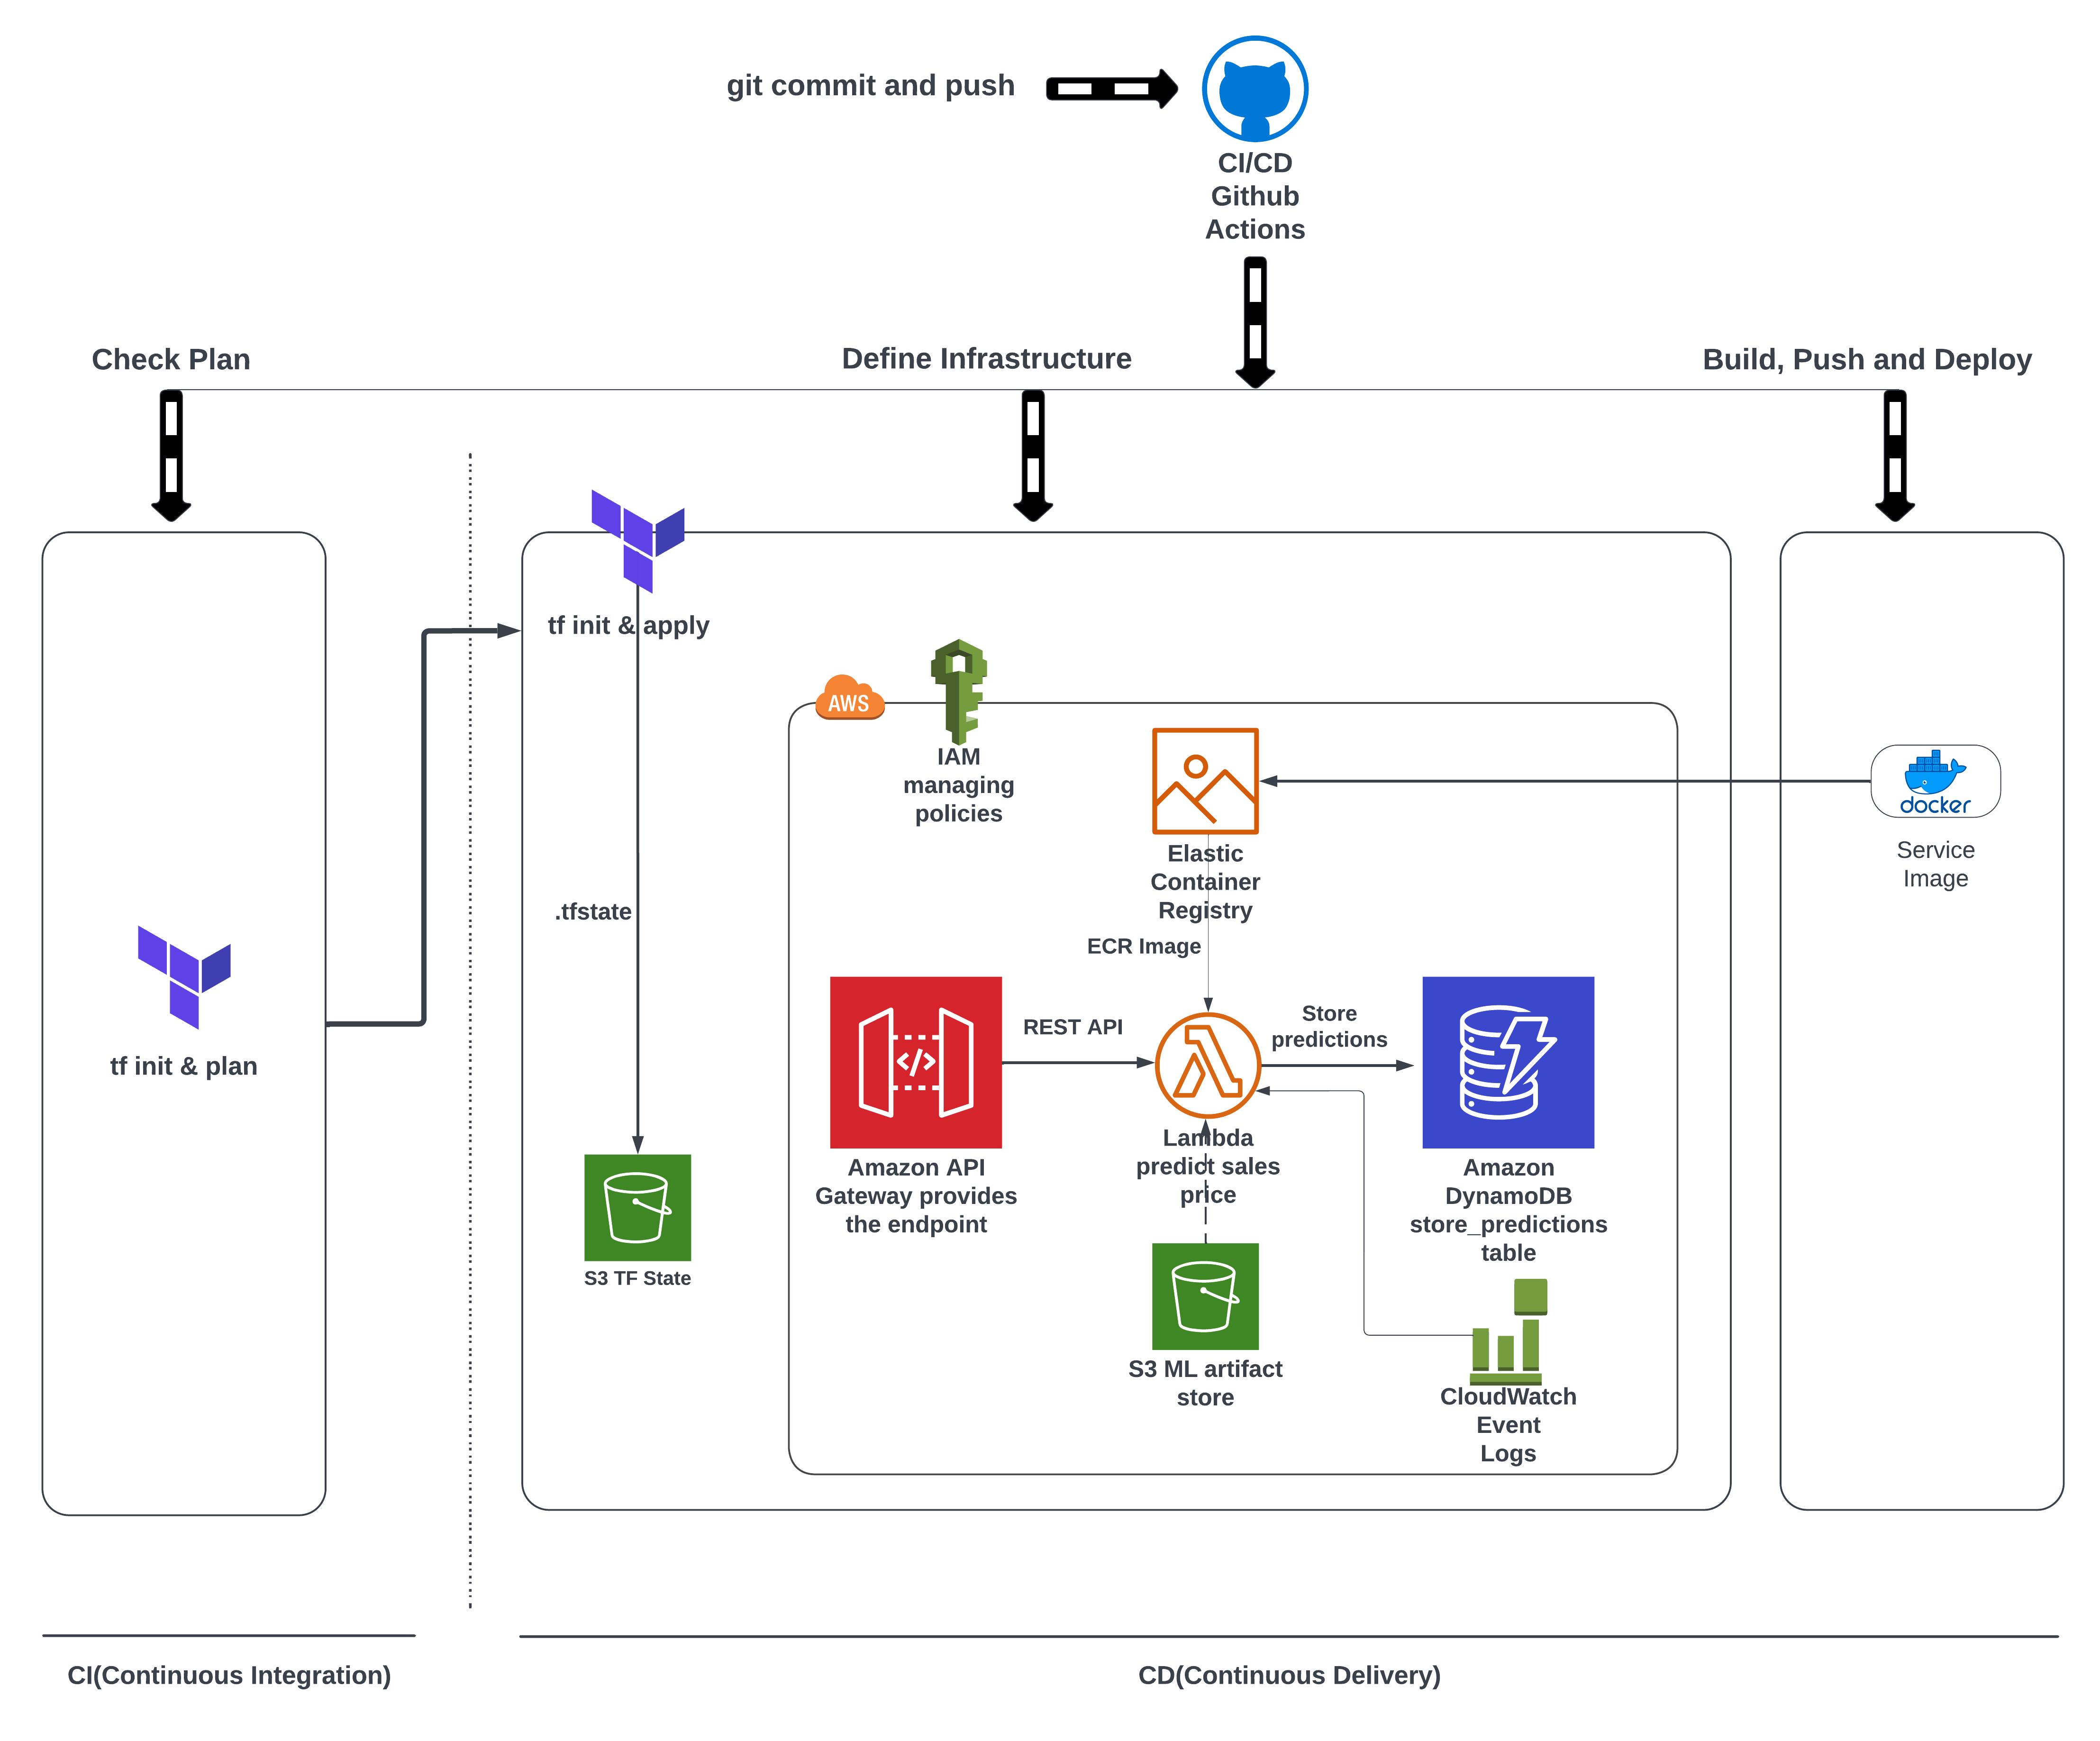
The Continuous Integration and Continuous Delivery abbreviated as CI/CD is an important part of software development cycle. This part provides the essential step in checking everything before the final product is ready to delivered to the customer. In our case, this step should create infrastructure to deploy the web application into the cloud. In other words, automate the tasks we did in part 3.
There are many tools for CI/CD. We will be using Github Actions as our code is in Github and make sense to automate the build, test and deploy pipeline with it. Our workflow will consist of running CI upon a pull request and CD when this pull request is merged to a particular branch.
Workflow
Github actions uses yaml syntax to define the workflow. Each workflow is stored as a separate YAML file in the code repository, in a directory named .github/workflows. 1
Since we’re doing both two workflows - pull and push, we will have two yaml files - ci-test.yml and cd-deploy.yml. This post will not explain syntax used in these files. It will explain how the tasks are accomplished through these syntaxes. For thorough understanding of syntax, read this document.

The source code is present at my github repo.
Triggers
We want to setup event based triggers to activate our workflows. Since we don’t to distrub main branch code base, we create two branches - develop and feature/ci-cd. We switch to the feature/ci-cd branch and define our workflows.
In ci-test.yml the trigger is set on pull_request on the branch develop. Meaning we commit our changes to the feature/ci-cd branch and then do a pull_request for develop branch. A pull in Github speak means “pulling/updating” new contents from another remote branch. Pull requests are usually done in UI as it is easy to review, clarify, approve changes and merge request.
However, in cd-deploy.yml we need our infrastructure setup deployed. So it makes sense to put a trigger upon commits being pushed into the develop branch. SO the trigger is push. This action is activated when the pull_request is merged into the develop branch.
Jobs
ci-test.yml
In CI, it is critical to check if all the parts are integrated together correctly. In our case, we need to confirm whether tf-plan works with our Terraform configuration.
In Github Actions, jobs are can be run on several hosted systems through actions. We will use ubuntu-latest with action version 3. That will in run calls aws-actions for credentials. We provide our AWS secrets to our Github secrets page. Github says the secrets are encrypted before reaching them. They also take measures to prevents secrets appearing in logs. 2
The actions access the AWS secrets to setup our final task to run our infrastructure plan.
Github Secrets
env:
AWS_DEFAULT_REGION: "us-east-1"
AWS_ACCESS_KEY_ID: ${{ secrets.AWS_ACCESS_KEY_ID }}
AWS_SECRET_ACCESS_KEY: ${{ secrets.AWS_SECRET_ACCESS_KEY }}
jobs:
tf-plan:
runs-on: ubuntu-latest
steps:
- uses: actions/checkout@v3
- name: Configure AWS Credentials
uses: aws-actions/configure-aws-credentials@v2
with:
aws-access-key-id: ${{ env.AWS_ACCESS_KEY_ID }}
aws-secret-access-key: ${{ env.AWS_SECRET_ACCESS_KEY }}
aws-region: ${{ env.AWS_DEFAULT_REGION }} - 1
- `${{ secrets.AWS_ACCESS_KEY_ID }} can also be directly used
Since the pipeline is used in production environment, we configure our terraform backend with our new production tfstate and use the plan command to check if our plan is valid, error-free and suitable to our needs.
TF Plan
- name: TF plan
id: plan
working-directory: "infrastructure"
run: |
terraform init -backend-config="key=mlops-grocery-sales-prod.tfstate" --reconfigure && terraform plan --var-file vars/prod.tfvars- 1
-
Change to
infrastructuredirectory to execute the terraform command
cd-deploy.yml
CI in this case does only tf-plan but usually it runs several unit and integration tests. We could combine these two files into one if we want but we will leave things as it is.
Similarly, the cd-deply.yml workflow file, check the tf-plan. Upon its success triggers the tf-apply job.
tf-apply
- name: TF Apply
    id: tf-apply
    working-directory: "infrastructure"
    if: ${{ steps.tf-plan.outcome }} == "success"
    run: |
      terraform apply -auto-approve -var-file=vars/prod.tfvars
      echo "name=rest_api_url::$(terraform output rest_api_url | xargs)" >> $GITHUB_OUTPUT
      echo "name=ecr_repo::$(terraform output run_id | xargs)" >> $GITHUB_OUTPUT
      echo "name=run_id::$(terraform output run_id | xargs)" >> $GITHUB_OUTPUT
      echo "name=lambda_function::$(terraform output lambda_function | xargs)" >> $GITHUB_OUTPUT
$GITHUB_OUTPUT takes Terraform outputs and displays them in the logs.
Deleting the infrastructure
If for some reason you wish to delete the resources created in the AWS Cloud, please follow these steps -
Goto infrastructure’s main.tf file. Comment out all the modules. Also comment out contents in outputs.tf
Then commit the changes, push, pull the request and merge the changes.
This should delete all the resources. Confirm with AWS Console.
Alternatively we can use terraform destroy ourselves if we know which tfstate and tfvars were used.
tf-destroy
terraform init -backend-config="key=mlops-grocery-sales-prod.tfstate" --reconfigure
terraform destroy -var-file=vars/prod.tfvars- 1
- Since we know which Terraform statefile is used for production
- 2
- Which production variable file is used
Conclusion
There it is our data pipeline that started with local development is fully integrated and automated into the cloud environment. Any changes made can be seamlessly tested and deployed. This concludes our “building data pipeline” series. Feel free to contact me for any questions or clarifications.